

20일차) 2025-01-23 (centGUI, dhcp/tftp/ftp/http, 포트)
cent7-gui


PxE kickstart
OS 설치시의 설정값을 셋팅을 통해 자동으로 OS가 설치 완료

- gui 서버에 접속해서 킥스타트 패키지 설치
[root@cent7-gui ~]# yum install -y system-config-kickstart
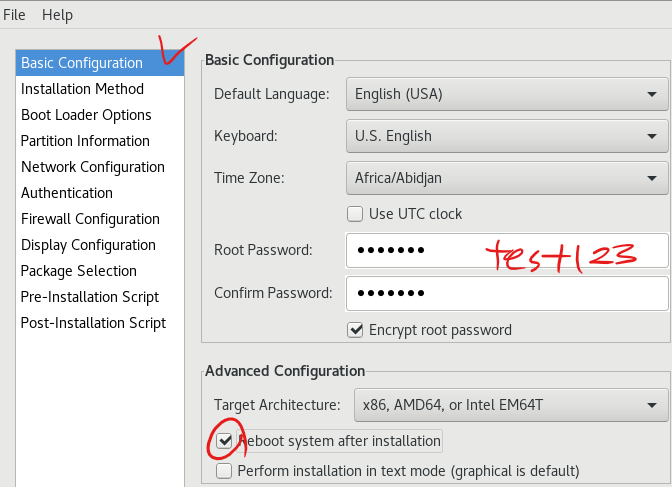
- Kickstart Configuration


# 기존에 boot loader가 존재한다면 안만들어도 되지만 우리는 부트로더가 존재하지 않으므로 새로 만들어야 함
부트로더
= 부트스트랩, 부팅 이전의 절차
커널을 동작시키고, 메모리, 디스크를 정의하여 부팅이 될 수 있는 상태를 만드는 행위


# 레이아웃에 두개있는지 확인


SWAP
리눅스에서 가상메모리, 디스크를 마치 램처럼 사용하는 것

- kick.cfg 수정
[root@cent7-gui ~]# vi /var/kick/kick.cfg
# 아래 내용 추가
%packages
@^minimal
@core
chrony
kexec-tools
%end
- pxe 서버의 pub 폴더에 같은 내용을 갖고 있는 동일한 파일 하나 만들기
[root@pxe ~]# cd /var/ftp/pub
[root@pxe pub]# vi kick.cfg
- /var/ftp/pub/kick.cfg에 /var/kick/kick.cfg 내용 복붙
#platform=x86, AMD64, or Intel EM64T
#version=DEVEL
# Install OS instead of upgrade
install
# Keyboard layouts
keyboard 'us'
# Root password
rootpw --iscrypted
11
1OY1ngum$NEOqu9p9uxPnFG3pcRaGD0
# System language
lang en_US
# System authorization information
auth --useshadow --passalgo=sha512
# Use graphical install
graphical
firstboot --disable
# SELinux configuration
selinux --enforcing
# Firewall configuration
firewall --disabled
# Reboot after installation
reboot
# System timezone
timezone Africa/Abidjan
# Use network installation
url --url="ftp://10.10.3.21/pub"
# System bootloader configuration
bootloader --location=mbr
# Clear the Master Boot Record
zerombr
# Partition clearing information
clearpart --all --initlabel
# Disk partitioning information
part swap --fstype="swap" --size=2048
part / --fstype="xfs" --grow --size=1
%packages
@^minimal
@core
chrony
kexec-tools
%end
- pxe pub에 킥스타트 절차 추가
[root@pxe pub]# vi /var/lib/tftpboot/pxelinux.cfg/default


실습)
pxe-dhcp 10.10.1.67 (client에게 ip 부여)
pxe-tftp 10.10.3.69 (부팅에 필요한 파일 전송)
pxe-ftp 10.10.3.21 (OS설치파일)
pxe-http 10.10.4.80 (킥스타트 파일)
pxe-client 10.10.3.0 /24 대역에서 150~160 아이피가 할당됐으면 좋겠다.
pxe 클라이언트들이 적절하게 OS가 설치되도록 한번 해보세요!
pxe 서버는 전부 미니멀로 해도 됩니다!


→ dhcp에서 nextserver가 tftp의 주소가 되는거고, tftp의 default에서 ftp ip로 다음을 지정하고,
ftp에서 필요한 파일을 설치하고, tftp에서 http의 kickstart를 가져와야 한다.
DHCP 서버
- dhcp 서버 설치 구성
TFTP 서버
- tftp 서버 구성
- iso 마운트, syslinux 설치
- vmlinuz, pxelinux.0, initrd.img 3개의 파일을 /var/lib/tftpboot에 복사
- /var/lib/tftpboot/pxelinux.cfg 폴더 생성 후 default 파일 구성
FTP 서버
- ftp 서버 구성
- iso 마운트
- 운영체제 파일을 /var/ftp/pub에 복사
HTTP 서버
- 킥스타트 파일 구성
0. Router
- 기본설정
- ip helper-address for dhcp
R1(config)#int f0/0
R1(config-if)#ip add 10.10.1.250 255.255.255.0
R1(config-if)#no sh
R1(config-if)#int f0/1
R1(config-if)#ip add 10.10.3.250 255.255.255.0
R1(config-if)# ip helper-address 10.10.1.67
R1(config-if)#no sh
R1(config-if)#int f1/0
R1(config-if)#ip add 10.10.4.250 255.255.255.0
R1(config-if)#no sh
R1(config-if)#int f2/0
R1(config-if)#ip add 211.183.3.250 255.255.255.0
R1(config-if)#no sh
R1(config-if)#exit
- NAT
R1(config)#access-list 1 per 10.10.0.0 0.0.7.255
R1(config)#int f0/0
R1(config-if)#ip nat inside
R1(config-if)#int f0/1
R1(config-if)#ip nat inside
R1(config-if)#int f1/0
R1(config-if)#ip nat inside
R1(config-if)#int f2/0
R1(config-if)#ip nat outside
R1(config-if)#ip nat inside source list 1 int f2/0 over
- 라우팅
R1(config)#ip route 0.0.0.0 0.0.0.0 211.183.3.2
1. DHCP server
[root@pxe-dhcp ~]# vi /etc/dhcp/dhcpd.conf
- /etc/dhcp/dhcpd.conf 내용 추가
# dhcp 꺼
subnet 10.10.1.0 netmask 255.255.255.0 {}
# tftp 꺼
subnet 10.10.3.0 netmask 255.255.255.0
{
option routers 10.10.3.250;
#GW
option subnet-mask 255.255.255.0;
#SM
range dynamic-bootp 10.10.3.150 10.10.3.160;
# 고전적인 방식
option domain-name-servers 8.8.8.8;
#DNS
allow booting;
#부팅 허용.
next-server 10.10.3.69;
#PxE(tftp) 서버의 주소.
filename "pxelinux.0";
# next-server에 가서 받아올 파일.
}
[root@pxe-dhcp ~]# systemctl restart dhcpd
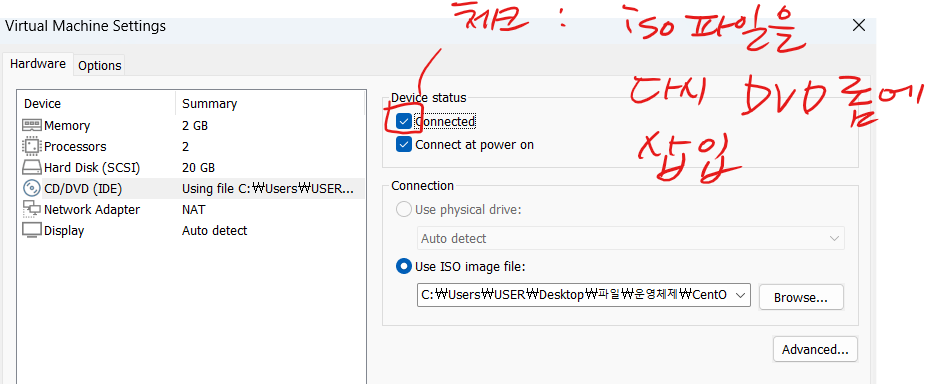
- iso 파일을 뺀 VM 하나로 확인해봤을때, IP를 잘 받아오는지 확인
- ♨ VMnet이 필요한 대역대에 있는지 확인 필수♨

2. TFTP server
[root@pxe ~]# yum install -y tftp-server syslinux
- vmlinuz , pxelinux.0 , initrd.img 3개의 파일을 /var/lib/tftpboot 에 복사
[root@pxe ~]# cp /media/images/pxeboot/vmlinuz /var/lib/tftpboot
[root@pxe ~]# cp /media/images/pxeboot/initrd.img /var/lib/tftpboot
[root@pxe ~]# cp /usr/share/syslinux/pxelinux.0 /var/lib/tftpboot
- /var/lib/tftpboot/pxelinux.cfg 폴더 생성 후 default 파일 구성
[root@pxe ~]# mkdir /var/lib/tftpboot/pxelinux.cfg
[root@pxe ~]# cd /var/lib/tftpboot/pxelinux.cfg
[root@pxe ~]# vi default
- default 내용 추가
DEFAULT centos7_pxe
LABEL centos7_pxe
kernel vmlinuz
APPEND initrd=initrd.img repo=ftp://10.10.3.21/pub
3. FTP server
[root@ftp ~]# yum install -y vsftpd
- iso 마운트
[root@ftp ~]# mount /dev/cdrom /media
- 운영체제 파일을 /var/ftp/pub에 복사
[root@ftp ~]# cp -r /media/* /var/ftp/pub
4. HTTP server
[root@ftp ~]# yum install -y httpd
[root@web ~]# vi /var/www/html/kick.cfg
- /var/www/html/kick.cfgc 내용 추가
#platform=x86, AMD64, or Intel EM64T
#version=DEVEL
# Install OS instead of upgrade
install
# Keyboard layouts
keyboard 'us'
# Root password
rootpw --iscrypted $1$1OY1ngum$NEOqu9p9uxPnFG3pcRaGD0
# System language
lang en_US
# System authorization information
auth --useshadow --passalgo=sha512
# Use graphical install
graphical
firstboot --disable
# SELinux configuration
selinux --enforcing
# Firewall configuration
firewall --disabled
# Reboot after installation
reboot
# System timezone
timezone Africa/Abidjan
# Use network installation
url --url="ftp://10.10.3.21/pub"
# System bootloader configuration
bootloader --location=mbr
# Clear the Master Boot Record
zerombr
# Partition clearing information
clearpart --all --initlabel
# Disk partitioning information
part swap --fstype="swap" --size=2048
part / --fstype="xfs" --grow --size=1
%packages
@^minimal
@core
chrony
kexec-tools
%end
[root@pxe-dhcp ~]# systemctl restart httpd
- 킥스타트 파일을 구성하고 TFTP server의 default 파일에 킥스타트 부분 추가
APPEND initrd=initrd.img repo=ftp://10.10.3.21/pub ks=http://10.10.4.80/kick.cfg
포트
서비스 ⊃ 포트
서비스는 어떤 포트를 통해서 제공되는지 생각해야 함, 사용하는 포트와 연관된 것에도 허용시킨다는 뜻

포트번호
| FTP | SSH | telnet | DNS | TCP, UDP | DHCP | UDP | TFTP | UDP | HTTP | NFS |
| 20, 21 | 22 | 23 | 53 | 67, 68 | 69 | 80 | 2049 |
흔히 말하는 ‘well-known’ 포트는 암묵적인 약속일 뿐, 꼭 반드시 해당 포트로 서비스를 제공해야 한다는 것을 뜻하진 않는다. 즉, 내가 원하면 서비스의 포트를 변경할 수도 있다. 즉, 포트는 일종의 통로 역할을 할 뿐이다.
방화벽 테스트
- 웹서버 설치하고 간단한 index.html 파일 만들고 방화벽 켜기
[root@web html]# echo 'firewall test' > /var/www/html/index.html
[root@web html]# systemctl restart firewalld


- 방화벽을 영구적으로 열고싶을때
[root@web html]# firewall-cmd --permanent --add-port=80/tcp
# 나는 지금 80번 포트로 웹서비스를 제공하고 있으므로 80번 포트를 열어보자
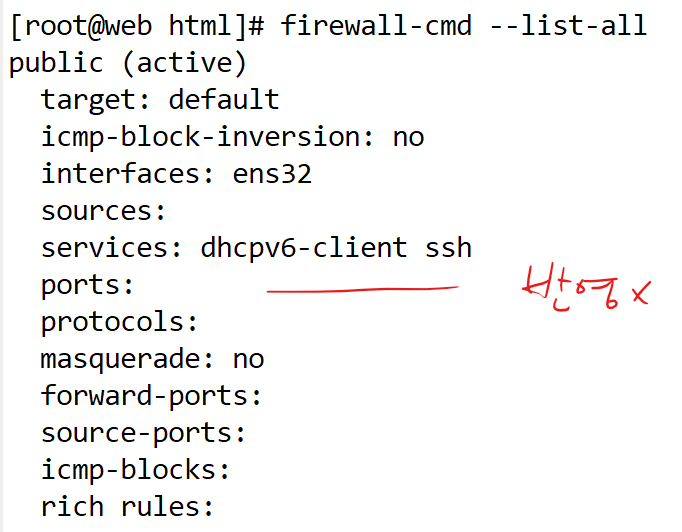
- 반영하고싶을때
[root@web html]# firewall-cmd --list-all


'AWS Cloud School 8기 > 리눅스(Xshell 8)' 카테고리의 다른 글
| 22일차) 2025-01-27 (LVM 실습, 시험_dhcp, dns, http/tftp/ftp, nfs, pxe) ♨ (1) | 2025.01.27 |
|---|---|
| 19일차) 2025-01-22 (FTP, TFTP, PxE) (1) | 2025.01.22 |
| 10일차) 2025-01-09 (Xshell 8에서 웹 템플릿 설정) (0) | 2025.01.09 |
| 9일차) 2025-01-08 (웹서버) (0) | 2025.01.08 |
| 8일차) 2025-01-07 (Xshell 8, Vim, 명령어) (1) | 2025.01.07 |