
서버 설치 후
dnf install -y httpd
systemctl restart httpd
systemctl enable httpd
systemctl stop firewalld
systemctl disable firewalld
내가 쳤던 명령어 목록을 앞에 줄번호 빼고 확인 가능
[root@new-web ~]# history | cut -c 8-

초기 셋팅
1. 방화벽 off
[root@web ~]# systemctl stop firewalld
[root@web ~]# systemctl disable firewalld
2. 셀리눅스 off
셀리눅스가 활성화 되어있으면 나중에 DNS나 KVM을 구성할때 문제가 발생 할 수 있음.
앞으로 실습할때 항상 방화벽과 셀리눅스는 비활성화를 하고 진행.
# 설정파일
[root@web ~]# vi /etc/selinux/config
# enforcing을 disabled로 수정
[root@web ~]# systemctl restart network
[root@web ~]# reboot
레포지토리
설치하고 싶은 패키지가 있는 저장소

[root@web ~]# cd /etc/yum.repos.d/
[root@web yum.repos.d]# vi CentOS-Base.repo

# enabled라는 항목이 없으면 기본적으로 활성화된 레포라는걸 뜻한다. enabled=0이면 비활성화
# repolist = 활성화된 레포지토리들
CentOS-Base.repo에 내용 덮어씌우기
1. ggdG: vi 편집기 명령모드에 전체 삭제
shift + insert: 아래 내용 복붙
2. cat <<EOF > /파일의 절대경로
> shift + insert: 아래 내용 복붙
> EOF
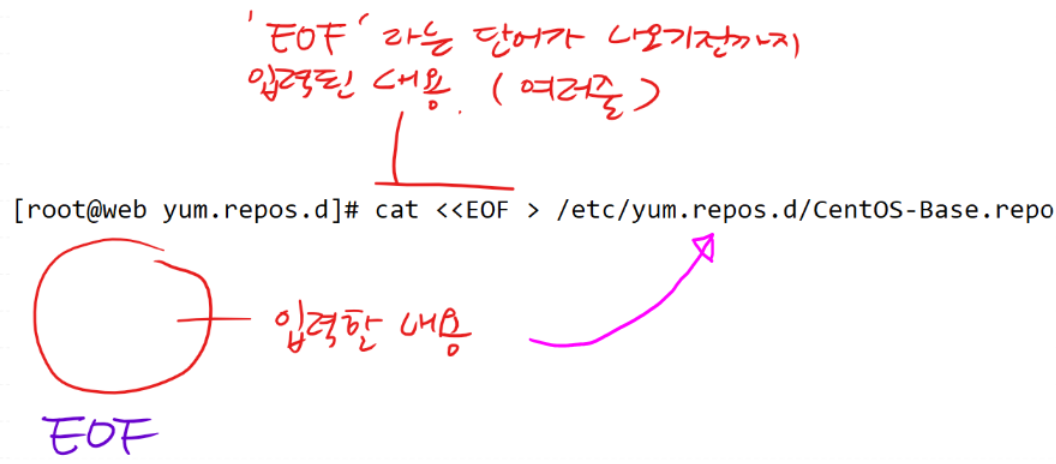
# << : 표준입력
# EOF(End Of File, 내가 맘대로정할 수 있음): EOF가 나오기전까지 입력된 여러줄의 내용을 파일에 리다이렉션
# > : 표준출력을 덮어쓰기
CentOS-Base.repo 내용
[base]
name=CentOS-$releasever - Base
#mirrorlist=http://mirrorlist.centos.org/?release=$releasever&arch=$basearch&repo=os&infra=$infra
baseurl=https://vault.centos.org/7.9.2009/os/x86_64/
gpgcheck=1
gpgkey=file:///etc/pki/rpm-gpg/RPM-GPG-KEY-CentOS-7

#released updates
[updates]
name=CentOS-$releasever - Updates
#mirrorlist=http://mirrorlist.centos.org/?release=$releasever&arch=$basearch&repo=updates&infra=$infra
baseurl=https://vault.centos.org/7.9.2009/updates/x86_64/
gpgcheck=1
gpgkey=file:///etc/pki/rpm-gpg/RPM-GPG-KEY-CentOS-7

#additional packages that may be useful
[extras]
name=CentOS-$releasever - Extras
#mirrorlist=http://mirrorlist.centos.org/?release=$releasever&arch=$basearch&repo=extras&infra=$infra
baseurl=https://vault.centos.org/7.9.2009/extras/x86_64/
gpgcheck=1
gpgkey=file:///etc/pki/rpm-gpg/RPM-GPG-KEY-CentOS-7

#additional packages that extend functionality of existing packages
[centosplus]
name=CentOS-$releasever - Plus
#mirrorlist=http://mirrorlist.centos.org/?release=$releasever&arch=$basearch&repo=centosplus&infra=$infra
baseurl=https://vault.centos.org/7.9.2009/centosplus/x86_64/
gpgcheck=1
enabled=0
gpgkey=file:///etc/pki/rpm-gpg/RPM-GPG-KEY-CentOS-7

#contrib - packages by Centos Users
[contrib]
name=CentOS-$releasever - Contrib
#mirrorlist=http://mirrorlist.centos.org/?release=$releasever&arch=$basearch&repo=contrib&infra=$infra
baseurl=https://vault.centos.org/7.9.2009/contrib/x86_64/
gpgcheck=1
enabled=0
gpgkey=file:///etc/pki/rpm-gpg/RPM-GPG-KEY-CentOS-7
# ifconfig 명령이 들어있는 패키지 설치
[root@web yum.repos.d]# yum install -y net-tools

# 웹서버 설치
[root@web yum.repos.d]# yum install -y httpd
정적 웹서버
프론트엔드로 만들어진 웹페이지(자바스크립트,css,html 같은) 파일을 단순히 보내주는 서버
데이터베이스와 연동x
apache(httpd), nginx 같은 프로그램이 있다.
# apache 설치
[root@web yum.repos.d]# yum install -y httpd

# 즉시 동작 및 재부팅후에도 동작하도록
[root@web yum.repos.d]# systemctl restart httpd
[root@web yum.repos.d]# systemctl enable httpd


# web-test라는 내용을 index.html에 넣기
[root@web html]# echo web-test > /var/www/html/index.html


실습)
211.183.3.80/test.html 을 쳤을때, good job이라는 내용이 뜨도록 한번 해보세요!


'AWS Cloud School 8기 > 리눅스(Xshell 8)' 카테고리의 다른 글
| 22일차) 2025-01-27 (LVM 실습, 시험_dhcp, dns, http/tftp/ftp, nfs, pxe) ♨ (2) | 2025.01.27 |
|---|---|
| 20일차) 2025-01-23 (centGUI, dhcp/tftp/ftp/http, 포트) (2) | 2025.01.23 |
| 19일차) 2025-01-22 (FTP, TFTP, PxE) (3) | 2025.01.22 |
| 10일차) 2025-01-09 (Xshell 8에서 웹 템플릿 설정) (1) | 2025.01.09 |
| 8일차) 2025-01-07 (Xshell 8, Vim, 명령어) (1) | 2025.01.07 |